Tryangle stolys for my Lord
Joinery
Craftsmen working in 16th century cities might be highly regulated in the types of tools and techniques they could use. In Elizabethan London, the cutting of square holes (called mortises) was the exclusive right of joiners, so a turner was restricted to round mortises.
Surviving chairs show how joiners used a combination of square and round tenons to produce stronger joints. In this technique, each rail ends with a square tenon on one end and a round tenon on the other. The joiner would cut a square mortise in the post and insert the square tenon, then bore a hole through the post and square tenon for the next rail. With the round tenon inserted in the hole, the square tenon is locked in place. A small peg can be used to lock the whole joint together.
Turners were restricted to simpler joinery. Where the rails had to meet, the tenons are tapered on the ends. This is not a strong joint, so the rails might be staggered so that the tenons only partially intersect; in this arrangement, one rail can lock another in place.
Construction Notes
A basic triangle stool can be completed on any lathe that will turn a spindle up to about 18 inches; smaller than this and you'll have to settle for a child's stool. Backstools and chairs require a longer lathe bed; I find 38 to 40 inches adequate.
Traditionally, the turner starts with a balk of wood that has been split (rather than sawn) from larger stock. This maintains the integrity of the grain and enables to turner to spot irregularities and weaknesses. Modern woodworkers tend to be less respectful of the grain, particularly when working with purchased lumber rather than pieces fresh out of the woodlot.
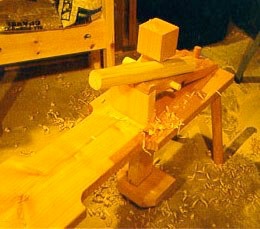
When working with manual lathes, it helps to shape the wood as much as possible before putting it on the lathe. This can be done through splitting and using a drawknife. A shaving horse is a useful tool to do this, first documented in De Re Metallica (1568).4
Shaving down a billet for a leg post.
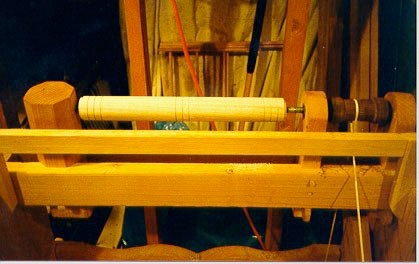
Turning down the billet to a finished post.
Before you begin turning, select the bit you will use to bore the mortises for your rails. I often use a 3/4-inch or 1-inch bit; I would not suggest going much smaller than that. If you are using antique bits, the size may not be a standard measure, so you will want to make a sample against which you can fit the tenons. Bore a hole using your selected bit in a piece of scrap wood and set your calipers just a hair larger than the hole. You will use this setting when you turn the tenons for the rails. You want a snug fit, but not so tight that you risk splitting the post or breaking the tenon. Remember, it's easier to remove wood later than to add it back.
Do not try to turn all the parts first; some pieces you will need to measure later in the process. Begin by turning the three upright posts. For a stool, I suggest making them 2 to 3 inches in diameter and 18 to 20 inches high. For backstools the backpost can be 38 to 40 inches (usually ending in a 1-1/2 to 2-inch tenon). Thicker posts will tend to provide stronger joints, especially wherever mortises intersect, but also make for a heavier piece.
There is some debate about historical seat heights, though in general I do not see enough consistency to offer a rule. It's my impression that seat heights varied according to the use of the stool/chair and its owner. If one is tending a hearth or doing handwork, a low stool may be desirable. If working at a table, a high stool may be better. In a rough environment, legs tend to get cut down as the feet decay/break/etc., so over its lifetime the seat may migrate downwards. It is true that some Elizabethan fashions are not conducive to bending, but I do not see a consistent trend of higher seat heights as a result. I typically put seats between 15 and 18 inches high, your own preference may vary.
Typically, these posts are shown with minimal decoration, usually just a few decorative grooves (usually three sets of three). These grooves also aid joining the piece by providing reference points for boring the mortises. Measure their location carefully so they will all be the same height from the ground.
Next, I suggest turning four of the six horizontal rails. These will form the two back edges of the stool. Make them 1 to 1-1/2 inches at their thickest, tapering to a slight shoulder before the tenon. If you do not taper them sufficiently, they will not fit into the angle formed by the corner of the stool. Each rail ends in a tenon sized to fit your caliper setting and at least one inch long. These tenons will be tapered so they meet snugly in the post.
Before you remove the rail from the lathe, cut the decorative grooves, which also mark where the vertical spindles will go. These can be spaced equally across the width of the rail, or grouped as you find pleasing, but they must match on each upper/lower pair of rails.
When you have four rails completed, bore mortises in one of the posts (this will become the "back corner" of the stool). These holes should form an angle between 60 and 75 degrees. The size of this angle will determine the width of the stool, but the wider you make it, the tighter the angles will be in the front corners (remember: all the angles of a triangle add up to 180). After you drill the first hole, insert one of the rails and use it as a guide for drilling the second hole for that side of the stool. If you are using modern tools, a drill press greatly simplifies this task.
The tenons for the horizontal rails must be trimmed so they will fit where they meet inside the upright post.
Next, bore two mortises each in the remaining two posts. When you assemble the posts and rails, it will define the triangle for the stool. Measure the distance between the front posts and turn the remaining rails. Using a straight-edge or line, mark the positions for the final set of rail mortises and bore them as you did previously.
Each pair of rails is supported by a pair of vertical spindles. These are usually undecorated and thinner than the rails (say, 3/4 inch in this case), though sometimes they are illustrated with knobs and grooves. Decorative rings on the rails mark where the mortises for these need to be bored, but you must take care that they are correctly oriented with regard to the tapers of the rail's tenons. Do not make these holes excessively deep or they will weaken the rail.
Now that you have completed the frame, you are ready to make the seat. This can be either a solid panel or multiple slats (leather was also used). You will need to cut a groove down the length of each seat rail, at a right angle to the vertical spindles. I find a 3/8-inch dado works well; if you use slats instead of a solid panel, 1/4-inch slats may sag. I use a snapline to mark the center line of the dado, then mark down its width with a gage. Cut the dado with a sharp knife and mortising chisel. I have seen examples where the maker cut the mortise before turning the rail (probably with a router), but I think the danger of tearing out the edges on the lathe make this risky.
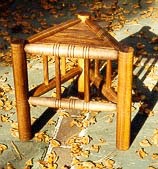
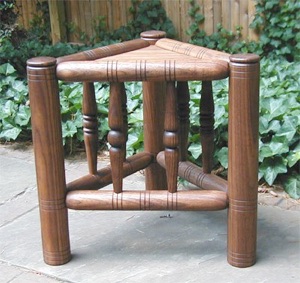
The completed frame.
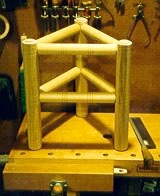
Cutting the dado for the seat.
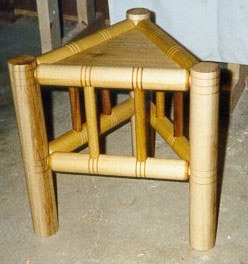
The seat panel is at the upper right.

Fitting a solid panel seat requires some trial and error. It helps to make a paper or cardboard template. If you are using slats, they need to be of sufficient thickness that the longest will not bow when you sit on it. Final assembly is a bit of a challenge, getting all the tenons into their mortises while getting the seat into place. There is no easy way to do this, but having a second pair of hands can help.
Finish
Notes
(1) Chinnery, p. 93.
(2) Chinnery, p. 84.
(3) Alberti, p. 41.
(4) Aricola, p. 41.
-
(5)Salzman, p. 159, 171.
Bibliography
Alberti, Leon Battista (Rykwert, Joseph; Leach, Neil; and Tavernor, Robert, translators). On the Art of Building in Ten Books. The MIT Press, Cambridge, 1996. Includes a rare medieval discussion of preparing and using various types of wood.
Aricola, Georgius. De Re Metallica. (Hoover, Herbert Clark and Hoover, Lou Henry, translators.) Dover Publications, Inc., New York, 1950.
Amman, Jost. The Book of Trades [Standebuch]. Dover Publications, Inc., New York, 1973. Excellent illustrations of numerous trades from mid-16th century Germany.
Chinnery, Victor. Oak Furniture, the British Tradition. Antique Collectors' Club Ltd, Suffolk, England, 1979. Both scholarly and readable, one of the most useful references for the period furniture-maker.
Gloag, John. A Social History of Furniture Design, from B.C. 1300 to A.D. 1960. Bonanza Books, New York, 1966. Good overview of furniture development.
Morris, Carole. "Aspects of Anglo-Saxon and Anglo-Scandinavian Lathe-Turning." Woodworking Techniques before A.D. 1500: Papers presented to a Symposium at Greenwich in September, 1980, together with edited discussion (McGrail, Sean, ed.). National Maritime Musuem, Greenwich, Archaeological Series No. 7, BAR International Series 129, 1982. Useful archaeological references for wooden artifacts.
Salzman, L.F. Building in England Down to 1540. Oxford University Press, Oxford, 1952 (Special edition for Sandpiper Books Ltd., 1997).
Underhill, Roy. The Woodwright's Shop (television series). UNC-TV, University of North Carolina Center for Public Television, Research Triangle Park, NC. 1999. An excellent introduction to traditional woodworking skills.
Additional Sources on Lathe Construction
Abbott, Mike. Green Woodwork. Guild of Master Craftsman Publications, Ltd, Lewes, East Sussex, 1989. Extensive discussions of building and using springpole lathes. Includes several lathe projects.
Bealer, Alex W. Old Ways of Working Wood. Bonanza Books, New York, 1980. Appendix on both a pole lathe and flywheel lathe.
Underhill, Roy. The Woodwright's Eclectic Workshop. University of North Carolina Press, Chapel Hill, 1991. Includes illustrations of an 18th century folding lathe.
Underhill, Roy. The Woodwright's Workbook. University of North Carolina Press, Chapel Hill, 1986. Discussions of bow-spring lathes, spring pole lathes, and flywheel lathes.
Perhaps the most basic type of seating furniture is the stool. Throughout the Middle Ages, stools were common seating in both upper class and peasant contexts. For purposes of discussion, I regard stools as any seat intended for a single person, sometimes with a back (a backstool), but never with arms. A common form of domestic stool was the three-legged turned stool. This type appears in numerous illustrations and was appropriate for both modest homes and the well-to-do. For example, "under the heading '...Tryangle stolys for my Lord...' an early sixteenth century inventory of the Earl of Northumberland included '...It'm, xij thre fottyde stooles, torned, the scetts of them of blake lether...'"1
Triangle stools are members of a larger family of turned tripod furniture, which also includes backstools and chairs. Though it's not entirely clear why the triangular design was so popular, one practical reason might be that it requires less labor and materials than making a four-legged stool (though four-legged varieties were also popular, often with seats of woven rush or bark). It might also have to do with three legs being more stable on an uneven surface (such as a dirt floor).
History and Design
It is not clear when the turned triangle stool became popular, but it seems to emerge in western European art early in the 15th century. French, German, and Flemish artists depict them in a wide variety of settings, from a peasant's farmhouse to a noble's manor. The triangle stool appears in a wide variety of sizes and proportions, from short and squat to tall and slender. Variations of this stool also appear as small tables or stands for washbasins. Prior to the mid-16th century, they are almost always very plain: simple cylinders with a few decorative grooves. By the late 16th century, they become more stylish, with elaborate profiles for the spindles. Their popularity seems to have mostly waned by the end of the 17th century, appearing very rarely thereafter. While commonly depicted in period art, no examples appear to have survived.
Some links to examples of triangle stools in period art include:
-
 Madonna with the Child (altarpiece) (1433-35), Master of Flémalle (Robert Campin) (b. ca. 1375, Valenciennes, d. 1444, Tournai).
 -
Scupstoel (1447-50), WEYDEN, Rogier van der (b. 1400, Tournai, d. 1464, Bruxelles).
-
The Lute Player and the Harpist (c. 1495/1503) by Israhel van Meckenem. Note there are no vertical spindles under the seat on this example.
-
Peasants by the Hearth (1560s), AERTSEN, Pieter (b. 1508, Amsterdam, d. 1575, Amsterdam). This clearly shows square tenons for the seat rails.
-
The Triumph of Death. (c. 1562), Pieter Bruegel the Elder (1525/30-1569).
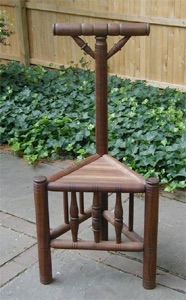
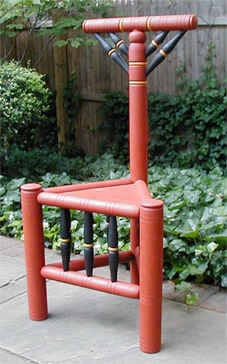
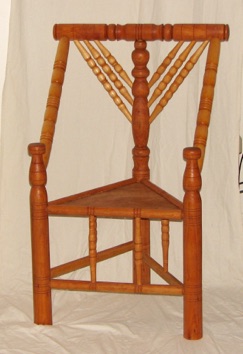
A close cousin to the triangle stool is the triangular "backstool," where the back post is extended up to provide back support. This style appears in artwork at the end of the 15th century, increasing in popularity through the 16th century. In the most common type, there is a curved backrest supported by two or four struts. In a less common type, the backrest is a turned cylinder, also supported by struts. There is also a single example (that I'm aware of) where the backpost ends in a ball fineal and there is no backrest at all. In general, triangle backstools are illustrated as furniture for the lower and middling sorts; presumably the better off could afford more fashionable joined chairs. Though also illustrated with some frequency in period art, no examples appear to have survived.
Some links to example of triangle backstools in period art include:
The Organ Player and His Wife (c.1495/1503) by Israhel van Meckenem. Note in this example the backpost ends in a ball fineal with no cross backrest.
The Visit to the Spinner (c.1495/1503) by by Israhel van Meckenem. Note the absence of vertical spindles and the delicate backrest.
The Fight between Carnival and Lent (1559) Pieter Bruegel the Elder.
Merry Company (1620-22), BUYTEWECH, Willem (b. 1591/92, Rotterdam, d. 1625, Haarlem). The backrest on which the monkey stands appears to be turned.
The height of tripod furniture is the turned armchair. These also appear in the 15th and early 16th century. The most simple type has a single backpost with a flat board for a backrest, with turned arms that run from the backrest to the extended tops of the front legs. More elaborate versions have a turned backrest, supported by multiple turned struts, with each arm comprising two or more turned spindles. In some examples, the backpost ends at seat level, and the backrest is a framework of spindles. Late examples are mazes of turned spindles sprouting yet more spindles, indulgent showpieces for the turner's art. While rarely illustrated, these have survived, and provide clues to the construction of the other missing types.
Two excellent examples are in the Victoria and Albert Museum Image Library, London. (I have not found a way to link to their images, but if you search on the exact string "THREE-LEGGED ARMCHAIR" in their image library, you will find these.)
I find triangle stools elegant in their simplicity. No advanced turning skills are required, as the spindles require only simple tapers and decorative grooves. The challenge comes in the triangular geometry of the joints. While no examples of this once-common form appear to have survived, surviving three-post chairs do not have equilateral seats and it is unlikely that stools of this design did either. By allowing the front edge to be wider than the back edges, you simplify the joinery (and make a more comfortable stool to boot).
Tools and Materials
Most of what we "know" about how medieval turners worked is based on the modern practices of rural "traditional" craftsmen. Very little was written about turnery prior to 1600, though Theophilus makes references to turning as early as the 12th century. One must take "traditional" sources with some caution, as a practice from the 18th or 19th century is not necessarily medieval and rural craftsmen may have preserved peculiarly rural techniques.
Such stools were probably turned on a lathe (though you could approximate the same stool through carving, and joined versions do exist). Medieval lathes were predominantly of the spring-pole type, where a cord was wrapped around the piece being turned, one end attached to an overhead spring-pole (or tree branch) and the other end to a treadle. This style of lathe is relatively simple to build, requires few parts the turner cannot make himself, and dominated chair-making up to the modern era. I use a flywheel treadle lathe, a somewhat more complex form of lathe that emerged by the late 15th century among pewterers and bell founders (but appears not to have been adopted by wood turners until much later).
While much medieval furniture was built of oak, oak does not turn well and was not as commonly used in turned furniture. Ash, walnut, and sycamore were popular for turning. as they combine strength and a tight grain.3 Fruitwoods such as cherry and pear will also do well, though their susceptibility to insect damage has left few period examples. If you are not confident in your skills and want to start with inexpensive stock, tulip poplar turns easily, takes paint well, and is readily available (don't worry about the green heartwood, it will turn to a nice light brown). European poplar was a popular wood for workaday furniture, such as the chests recovered from the Tudor warship Mary Rose.
Medieval turners frequently worked in unseasoned wood. In an era before power tools and high-speed steel, turning green wood required less labor and put less wear on the turner's tools. A drawback of this technique is that as the work dries out, it will tend to become oval and may crack. Seasoned wood is more stable, but also more difficult to turn on a pole lathe. Medieval craftsmen understood these tradeoffs and used both mediums; In the middle of the 15th century, Leon Battista Alberti wrote:
-
We have seen our own carpenters immersing timber in water and leaving it covered in mud for a period of thirty days, especially if it is to be used for turning; they say that it will accelerate the curing process and make the wood easier to manage, whatever the intended use.3
Copyright 2009, Thomas Rettie.